iOS Splash Screen
a guide to create a splash screen for iOS.
assuming your project is named Example
- Open your project using
XCodeand choose theiosfolder inside your React Native root directory. - Using the left sidebar
Project Navigatornavigate toExample/Example/Images. - Add a new image set for your splash screen and named
SplashScreen.

- You have two options for the kind of the splash screen image:
- A full image with background and icon in the center (sizes matter).
- A single png icon without the background (recommended).
- After choosing splash screen images head to
Example/Example/LaunchScreen. - You can remove default labels by selecting them and press
Delete. - Now we can add our splash screen image by pressing the top
+button and choosing our image.

- To center the image and control auto resizing, turn on the right side panel (make sure your are selecting the splash image component).

- If you choose a splash screen image without a background it is a good idea to set a background color. (make sure your are selecting the splash image component).

- Now test your splash screen on a different screen sizes.

Using dynamic background color
Instead of using single solid color for the splash screen background color we can use a dynamic color for the light and dark themes.
- Go to
Example/Example/Imagesand press the+button then chooseColor Set(the same menu we add theImage Setfrom) - Name it for example
splashScreenBgColorthen choose the light and dark color values. - Now the color set we created will show as an option when changing the splash screen background color as we did above.
Dismissing the splash screen manually
To be able to dismiss the splash screen we need to create a Native Module to able to invoke and hide the splash screen when the app is ready.
Create
specs/NativeSplashScreenin the root of your project.import { TurboModuleRegistry } from "react-native";import type { TurboModule } from "react-native";export interface Spec extends TurboModule {hide(): void;}export default TurboModuleRegistry.getEnforcing<Spec>("NativeSplashScreen");Configure Codegen by adding the following to your project
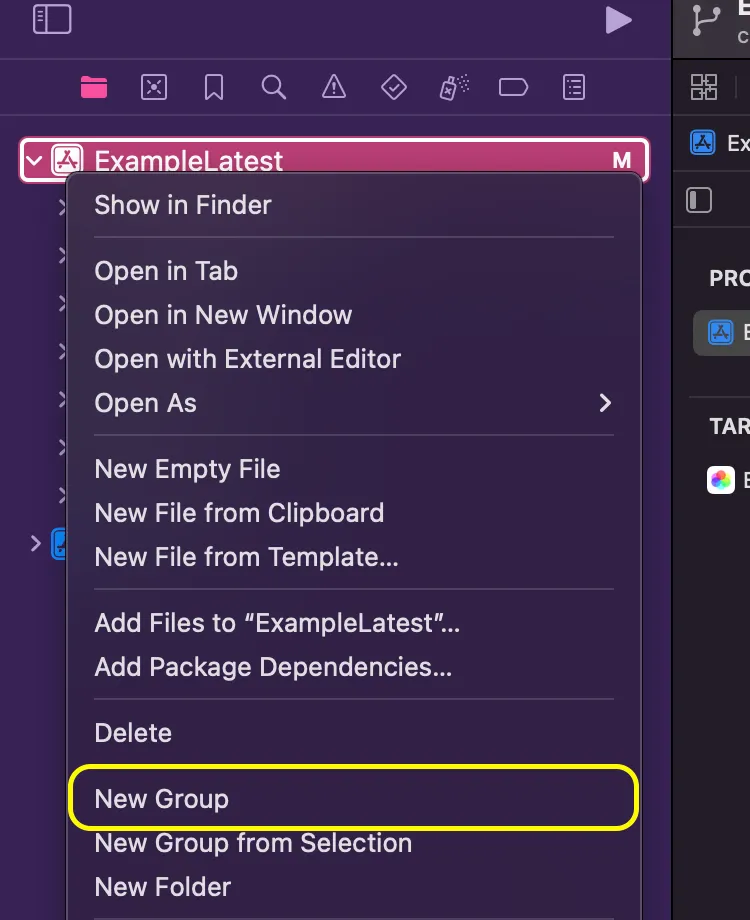
package.json, then runcd ios && bundle install && bundle exec pod install. This is automatically run when you build your Android application."codegenConfig": {"name": "NativeSplashScreenSpec","type": "modules","jsSrcsDir": "specs","ios": {"modulesProvider": {"NativeSplashScreen": "RCTNativeSplashScreen"}}},Open your iOS project with
XCodeand create a new group and named itNativeSplashScreen.
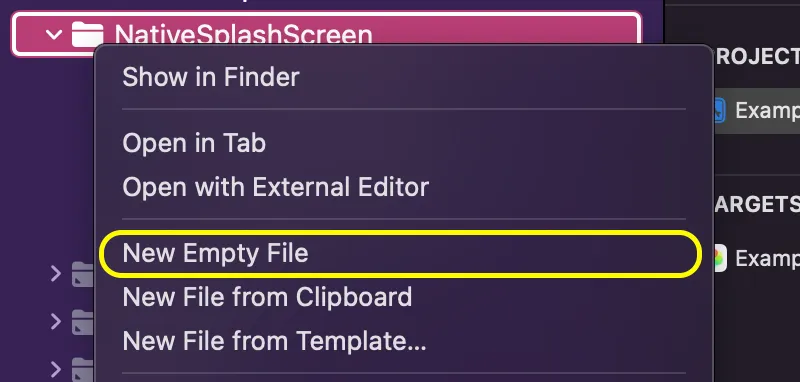
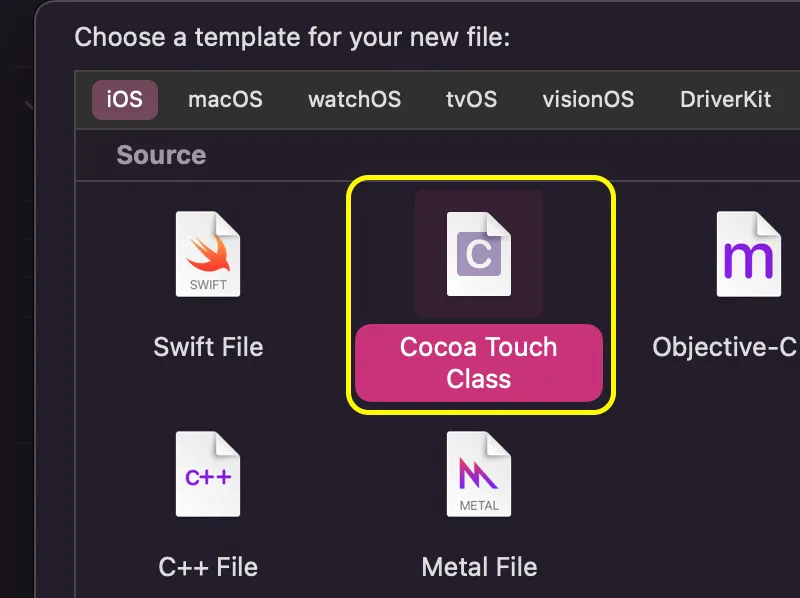
- In the group we have just created, create a new file from template and choose
Cocoa Touch Classand name itRCTNativeSplashScreenwith theObjective-Clanguage.
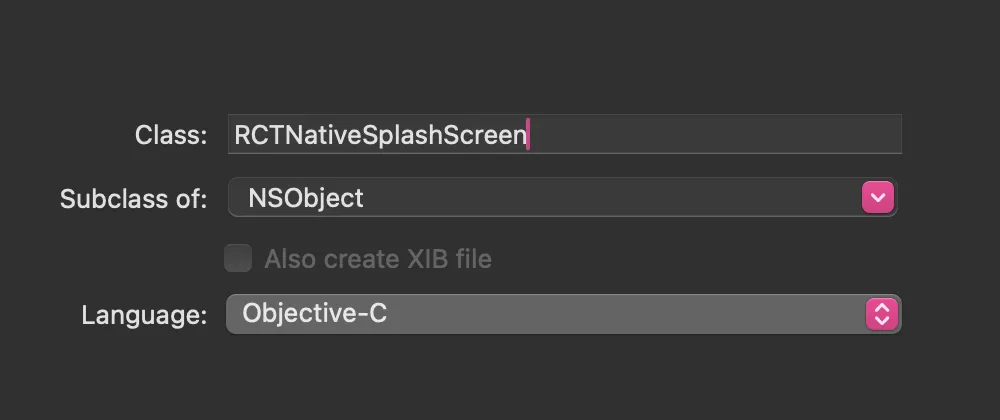
Rename
RCTNativeSplashScreen.m→RCTNativeSplashScreen.mmmaking it anObjective-C++file.Create another file in the group using create file from template and this time choose
Swift Filethen name itRCTNativeSplashScreen.In the same group create a bridging header file by choosing create from template then
Header Fileand name it<yourAppName>-Bridging-header.h,Xcodewill automatically prompt you to create a bridging header(Only One is Needed).Copy to
RCTNativeSplashScreen.h.#import <Foundation/Foundation.h>#import <NativeSplashScreenSpec/NativeSplashScreenSpec.h>NS_ASSUME_NONNULL_BEGIN@interface RCTNativeSplashScreen : NSObject <NativeSplashScreenSpec>@endNS_ASSUME_NONNULL_ENDCopy to
RCTNativeSplashScreen.mm#import "RCTNativeSplashScreen.h"#import "ExampleLatest-Swift.h"@implementation RCTNativeSplashScreenRCT_EXPORT_MODULE(NativeSplashScreen) // Export module to Objective-C runtime// Create an instance of the Swift classRCTNativeSplashScreenImpl *nativeSplashScreen = [[RCTNativeSplashScreenImpl alloc] init];(std::shared_ptrfacebook::react::TurboModule)getTurboModule:(const facebook::react::ObjCTurboModule::InitParams &)params {return std::make_sharedfacebook::react::NativeSplashScreenSpecJSI(params);}#pragma mark - Swift Splash Screen Methods(void)hide {[nativeSplashScreen hide]; // Call Swift method}@endCopy to
<yourAppName>-Bridging-header.h.//// Use this file to import your target's public headers that you would like to expose to Swift.//#import "RCTAppDelegate.h"Copy to
RCTNativeSplashScreen.swift.import UIKit@objcMembersclass RCTNativeSplashScreenImpl: NSObject {private static var spView: UIView?// Helper function to get the main windowprivate func getMainWindow() -> UIWindow? {returnUIApplication.shared.connectedScenes.compactMap { 0.windows }.first { $0.isKeyWindow }}// Helper function to get splash screen viewprivate func getSplashScreenView() -> UIView? {return UIStoryboard(name: "LaunchScreen", bundle: nil).instantiateInitialViewController()?.view}// Re-add splash screenfunc keepOn() {guard let mainWindow = getMainWindow() else { return }guard let launchScreen = getSplashScreenView() else { return }launchScreen.frame = UIScreen.main.boundslaunchScreen.autoresizingMask = [.flexibleWidth, .flexibleHeight]mainWindow.addSubview(launchScreen)RCTNativeSplashScreenImpl.spView = launchScreen}func hide() {DispatchQueue.main.async {guard let launchScreen = RCTNativeSplashScreenImpl.spView else { return }// fade-outUIView.animate(withDuration: 0.3,animations: { launchScreen.alpha = 0.0 }) { _ inlaunchScreen.removeFromSuperview()}}}}Go to
<yourAppName>/AppDelegate.swiftand add the following.import Reactimport ReactAppDependencyProviderimport React_RCTAppDelegateimport UIKit@mainclass AppDelegate: UIResponder, UIApplicationDelegate {var window: UIWindow?var reactNativeDelegate: ReactNativeDelegate?var reactNativeFactory: RCTReactNativeFactory?func application(_ application: UIApplication,didFinishLaunchingWithOptions launchOptions: [UIApplication.LaunchOptionsKey: Any]? = nil) -> Bool {let delegate = ReactNativeDelegate()let factory = RCTReactNativeFactory(delegate: delegate)delegate.dependencyProvider = RCTAppDependencyProvider()reactNativeDelegate = delegatereactNativeFactory = factorywindow = UIWindow(frame: UIScreen.main.bounds)factory.startReactNative(withModuleName: "ExampleLatest",in: window,launchOptions: launchOptions)// ADD THISRCTNativeSplashScreenImpl().keepOn()return true}}Call it from JavaScript
import NativeSplashScreen from "../specs/NativeSplashScreen";// when your app is fully loaded call this to hide the splash screenNativeSplashScreen.hide();
Animated Splash Screen
In iOS there is no native way for implementing animated splash like Android, but there is a work around, adding a SwiftUI View that matches exactly the app splash screen.
First we create the View to add it immediately after the app launches, create
SplashScreenView.swiftfile in your iOS project.import SwiftUI// App Logo, we replicate the logo by reading the SVG valuesstruct AppLogo: View {private let size = 432.0 // the view box of the SVG// The transition state values for each item in the logo (reactive for the animation)@State private var xOffsets: [CGFloat] = Array(repeating: 0, count: 6)@State private var yOffsets: [CGFloat] = Array(repeating: 0, count: 6)// This function will handle each item animationprivate func animateByIndex(idx: Int, x: CGFloat = 0.0, y: CGFloat = 0.0) {let duration = 0.8withAnimation(.smooth(duration: duration)) {xOffsets[idx] = xyOffsets[idx] = y}}var body: some View {GeometryReader { geometry in// To keep scale the logo properly on different screen sizeslet scaleFactor = geometry.size.width / sizeZStack {Color.clear // transparent backgroundCircle().fill(Color(red: 1, green: 0, blue: 1)).opacity(0.5).frame(width: 100 * scaleFactor, height: 100 * scaleFactor).position(x: (166 + xOffsets[5]) * scaleFactor,y: (194 + yOffsets[5]) * scaleFactor).onAppear { animateByIndex(idx: 5, x: 100, y: 44) }Circle().fill(Color(red: 0, green: 0, blue: 1)).opacity(0.5).frame(width: 100 * scaleFactor, height: 100 * scaleFactor).position(x: (166 + xOffsets[4]) * scaleFactor,y: (238 + yOffsets[4]) * scaleFactor).onAppear { animateByIndex(idx: 4, x: 100, y: -44) }Circle().fill(Color(red: 0, green: 1, blue: 1)).opacity(0.5).frame(width: 100 * scaleFactor, height: 100 * scaleFactor).position(x: (216 + xOffsets[3]) * scaleFactor,y: (266 + yOffsets[3]) * scaleFactor).onAppear { animateByIndex(idx: 3, x: 0, y: -100) }Circle().fill(Color(red: 0, green: 1, blue: 0)).opacity(0.5).frame(width: 100 * scaleFactor, height: 100 * scaleFactor).position(x: (266 + xOffsets[2]) * scaleFactor,y: (238 + yOffsets[2]) * scaleFactor).onAppear { animateByIndex(idx: 2, x: -100, y: -44) }Circle().fill(Color(red: 1, green: 1, blue: 0)).opacity(0.5).frame(width: 100 * scaleFactor, height: 100 * scaleFactor).position(x: (266 + xOffsets[1]) * scaleFactor,y: (194 + yOffsets[1]) * scaleFactor).onAppear { animateByIndex(idx: 1, x: -100, y: 44) }Circle().fill(Color(red: 1, green: 0, blue: 0)).opacity(0.5).frame(width: 100 * scaleFactor, height: 100 * scaleFactor).position(x: (216 + xOffsets[0]) * scaleFactor,y: (166 + yOffsets[0]) * scaleFactor).onAppear { animateByIndex(idx: 0, x: 0, y: 100) }}}}}// The View to replace the splash screen withstruct SplashScreenView: View {var body: some View {ZStack {Color("SplashScreenBG").ignoresSafeArea()AppLogo().aspectRatio(1, contentMode: .fit).frame(width: UIScreen.main.bounds.width,height: UIScreen.main.bounds.height).edgesIgnoringSafeArea(.all)}}}// For Xcode live previewstruct SplashScreenView_Previews: PreviewProvider {static var previews: some View {SplashScreenView()}}Replacing the Splash Screen, the code to do so:
// Create a hosting controller with the splash screenlet splashHostingController = UIHostingController(rootView: SplashScreenView())// Configure the hosting controller's viewsplashHostingController.view.backgroundColor = .clear // Ensure transparencysplashHostingController.view.frame = UIScreen.main.boundssplashHostingController.view.autoresizingMask = [.flexibleWidth, .flexibleHeight]// Note: you need a reference to the root windowmainWindow.addSubview(splashHostingController.view)// Hide with fadeoutUIView.animate(withDuration: 0.3, animations: { launchScreen.alpha = 0.0 }) { _ insplashHostingController.view.removeFromSuperview()}Using it with the native module we created previously to hide the splash manually.
import SwiftUIimport UIKit@objcMembersclass RCTNativeSplashScreenImpl: NSObject {private static var spView: UIView?// Helper function to get the main windowprivate func getMainWindow() -> UIWindow? {returnUIApplication.shared.connectedScenes.compactMap { 0.windows }.first { $0.isKeyWindow }}// Helper function to get splash screen viewprivate func getSplashScreenView() -> UIView? {return UIStoryboard(name: "LaunchScreen", bundle: nil).instantiateInitialViewController()?.view}// Re-add splash screenfunc keepOn() {guard let mainWindow = getMainWindow() else { return }// Create a hosting controller with the splash screenlet splashHostingController = UIHostingController(rootView: SplashScreenView())// Configure the hosting controller's viewsplashHostingController.view.backgroundColor = .clear // Ensure transparencysplashHostingController.view.frame = UIScreen.main.boundssplashHostingController.view.autoresizingMask = [.flexibleWidth, .flexibleHeight]mainWindow.addSubview(splashHostingController.view)RCTNativeSplashScreenImpl.spView = splashHostingController.view}func hide() {DispatchQueue.main.async {guard let launchScreen = RCTNativeSplashScreenImpl.spView else { return }// fade-outUIView.animate(withDuration: 0.3,animations: { launchScreen.alpha = 0.0 }) { _ inlaunchScreen.removeFromSuperview()}}}}